Storing all your gear is a lot like camping, it’s very personal. From the amount of gear you have to the storage space you’re working with will be different for everyone. The most important thing is to store your camping gear so it won’t get damaged and having quick accesses to it. Let’s look into some tips on how to store gear for many different storage spaces. Also, how to prevent gear from getting damaged while in storage.
Camping Gear Storage Best Practices
Ideally, you have a very large space with a full staff to look over all your things. Temperature controlled room to prevent any mold from forming. Pegboards on the wall to hold any number of your thousand pieces of backpacking gear.
But, that’s not why you’re here. You are just like me, with limited storage space looking to maximize what you have.
In every scenario from limited space like a small apartment to a two-car garage, clear bins are going to be our best option. They come in a large assortment of sizes, preferably with lids. They provide easy access to hiking gear while being able to see what’s on the bottom of the container.
Pro tip – Use desiccant pacts in storage bins to prevent mildew and odor.
Use Post-it notes and a master gear list. You don’t have to go crazy labeling everything, but a general idea of what you have in a storage bin will be satisfactory. If you want to sticker solution, duct tape and a sharpie work as well.
Organization can help new campers that are joining with you for the first time. With everything in its place, you can quickly let someone borrow or try a piece of gear for the first time.
Remember, you can always discard, give away or sell some old backpacking gear. It might be better used by someone else. The best way to keep your gear organized is to use it often. If you haven’t used something for years, you might not need it.
How to Store Camping Gear in a Small Apartment
When living in a small space, it’s even more important to stay organized than having a garage all to yourself. Space is valuable, and using that space, creatively will save time and headache in the long run.
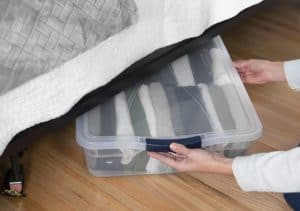
Storage Bin Under the Bed
Use low profile clear bins that will slide under your bed. Use these furniture lifters from iPrimio for an extra two inches. What’s nice about these furniture lifters from other ones is that they are stackable. If you’re comfortable with your bed even higher, then get four inches with another set.
Those furniture lifters are also great for a couch. Slip your longer hiking and backpacking gear such as skis, backpacks, and trekking poles under there.
Storage Bins and Shelves in the Closet
I know, your closet is full. I lived in a camper for a year, so I know in small spaces, every area gets used up quickly. But take a look inside the closet to see if the space you have can be used more efficiently.
Storage bins come in just about every size, so get ones that fill the space completely. Keep the camping equipment you’ll use less on the bottom container and label it so you won’t have to peek in wondering what you put in there.
Hang Gear on the Wall As Art
Embrace your outdoor lifestyle and show off the gear you have. Sometimes it’s too much of a bother to hide everything out of sight. Make your gear look attractive, then call it art.
Door Hanger
A large sturdy hook on the back of a door can stay out of sight while being an excellent place for your hiking backpack. It’s a backpack, so fill it full of stuff or keep all your camping non-perishables inside. Hang your sleeping bag in a large laundry bag on the back of the door too.
Install a Curtain Rod
Install a curtain rod or steel pipe in a closet to hang more gear. Smaller gear can be put in large soccer ball storage net bags. This can also be used to attach other bags to keep other small items, like a camping stove.
Rent Camping Gear Online
If you’re coming up short on camping gear or you don’t have the space to store everything, why not rent. Renting also gives an excellent opportunity to try new mountaineering gear that you’re thinking of buying.
Receive the gear by mail, use it and just send it back without even cleaning it (they actually told me to not clean the gear before returning it). Tents, hiking backpacks, stoves, or anything else you would ever need can be rented.
How to Store Camping Gear at Home
In a medium-sized home with a garage or not, you’re going to have many more options. Still rely on clear storage bins of different sizes. Separate your gear with the activities you’ll need. Winter goes with winter gear, etc.
Another tip is to organize by the length of time. Keep your day bag full of what your next trip will most likely need. This makes it easy to grab the day pack and go.
Stack Gear on Shelves
If space allows shelves can easily be put together in an hour or two. Larger, more massive bins on the bottom and smaller bins in easy-to-reach locations for the gear you’ll use most often.
Store Long Items
Use a tall laundry basket or trash can in the corner to store awkwardly long items like oars, foam sleeping pads and trekking poles. These more extended pieces of gear can also be stuffed under a bed or the backside of a walk-in closet.
Keep Your Bags Packed
This is what I do, along with using bins. Camping stove, headlamp, and a small dry bag (full of more gear) fit perfectly inside a large hiking backpack. If something is non-perishable, it can stay inside the pack.
Of course, never do this with your sleeping bag. They need to be stored in a large laundry bag or hung to prevent damage.
Here’s an article I wrote about taking care of sleeping bags to get the most life out of them.
Proper Care and Storage of Camping Gear in a Garage
With a space of a garage or shed, you will have a ton of options. Of course, having a basement to hold everything will work just as well, but make sure to use desiccant pacts in your bins. This is the best way of staying organized while keeping your gear safe.
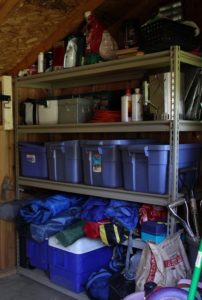
Build Multiple Shelves
A multi-shelf rack stores a lot of gear in one convenient location. Helmets and light items can go on the top shelves with large bins on the bottom.
Separate clear bins into “groups” of gear. For example, a camp stove and kitchen bin, a car camping bin with a blanket, a camp clothing bin with jackets, etc.
Metal Pipe to Hang Sleeping Bags From
A metal pipe can be used to hang all sorts of things from. It’s horrible for sleeping bags to stay compressed, so the best way for long term storage is hanging or inside a sizable laundry bag. Most sleeping bags come with one or two small fabric hooks on the bottom, that will be used to hang. Also, hang jackets, shirts and pants only used for camping.
Store Your Camping Gear With a Pegboard Gearwall
Pegboards can be built from scratch or purchased in a kit. They are a great way of organizing equipment and seeing what you have with a quick glance. Remember that gear hanging from this board will get heavy, so drill into studs. Leave about 1/2 inch of space between the pegboard and the wall.
Tarps for Dust Control
Just about everyone I know uses tarps, but instead of rolling or packing them away, throw them over bins or boxes to keep the dust-out. This can be especially useful in environments like a shed with a lot of dust floating around. I use an old sheet for this over a few of my backpacks.
How to Store Specific Camping Gear
We have gone over best practices and storing equipment in small and large spaces. Let’s go over how to store specific pieces of camping gear the proper way.
Backpacks
Make sure the entire backpack is dry. If spots need to be cleaned, do so, then let the backpack completely air dry. It doesn’t need to be sitting in direct sunlight, just in an open area with some crossflow.
Tents
Every morning while camping, a thick dew is on my tent. I do the best I can to let it dry, but usually, I have to pack it up and move to the next campsite. When I get home, the tent is still a little wet. Let your tent completely dry.
Tents are a bit of a pain to clean, so make sure it’s dry, so no mildew will grow. Do not fold your tent. Repeatedly folding, it can tear the fabric or damage the waterproof coating. Instead, roll your tent into a sack and store it somewhere out of direct sunlight
Sleeping Bags
I wrote a very detailed article for taking the best care of your sleeping bag and how to clean it properly. The most important thing on how to store a sleeping bag is to make sure it’s not compressed. Never put your bag back in his compression sack when storing; this will eventually destroy the loftiness of the fill.
If you don’t have a storage bag or it’s worn out, they can be purchased for around ten bucks on Amazon.
If you’re able to hang it, that’s even better. For a very cramped space (apartment), it can be rolled up and stored under a bed. While not ideal, it’s still better than storing a sleeping bag in a compression sack.
Camping Stove and Fuel
When you get home from camping, take inventory of the fuel that’s left. If you are using fuel canisters, they can be weighed. I get about 12.5 boils out of 100 grams of fuel with 500ml of water each time. An empty 100g canister will weight 92g. So if you weight the fuel canister at home and it’s 152g, then you know you’ll have around a little over 7 more boils lift in that canister.

Point being, use a post-it or a Sharpie and mark how many more boils are left in that fuel canister. This way, the next time you grab your stove, you’ll know how much fuel you have and if another canister is needed.
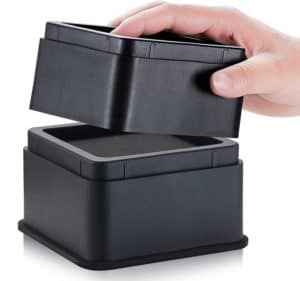
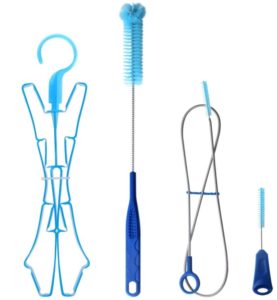
Water Bladder
This is the first piece of backpacking gear I’ll clean when I get home. Disassemble the water bladder, cleaning the small parts such as mouthpiece and tube. Let the bladder completely dry before storing it in the freezer. This will prevent mildew and any funky taste developing.
If you don’t want to store the water bladder in the freezer, that’s fine. After cleaning and thoroughly drying it, roll it up and store it in a large Ziploc bag with a food-grade desiccant pack.
You can also get a cheap cleaning kit specifically for cleaning and drying out the water bladder. These cleaning kits include small brushes for rodding out the tube and frame for drying it out. This one is under ten bucks that includes all that stuff on Amazon here.
Hiking Boots
Once again, with everything else, make sure they are completely dry. If they are wet, remove the soles. When dry, use Silica Gel Packs inside and wrap in acid-free paper. Paper is an absorbent that protects the boots from deterioration, as well as maintain the boots’ proper moisture level.
A newspaper can also be used instead of acid-free paper. Avoid wrapping boots in plastic. Boots need to breathe properly, even while in storage. Wrapping leather in plastic causes the boot to be prone to mold attacks and the eventual discoloration of the hiking boots.
I hope these tips have helped keep your gear better organized. If you have any tips or suggestions on camping gear or best practices, feel free to leave a comment down below. If you are finding it a challenge to come up with a new space for more gear that’s needed look into renting it.
I wrote a detailed article after calling the 7 best rental companies, breaking down the best ones and some surprising gear rental policies some have. Check out the article here.