
If back, hip or shoulder pain is a routine experience on your hike and has you grunting in pain, then there’s a high chance your hiking backpack doesn’t fit you properly.
This is a common problem among beginner and even experienced hikers. The good news is, that your hiking backpack doesn’t have to be uncomfortable. Here are some tips on how to make your hiking backpack more comfortable for your next long day on the trail.
Do You Have to Break in a Hiking Backpack
This may come as a shock, but no, you don’t have to break in a hiking backpack.
Unlike a pair of hiking boots that are stiff and need to adjust to the specific shape and pressure points of your foot, how comfortable a backpack depends on the fit and correctly packing your gear.
How Can I Make My Hiking Backpack More Comfortable
The first step to making your hiking backpack more comfortable is finding one that fits your body.
A well-fitted backpack will make your experience more enjoyable and help you to expend less energy on the trail.
A hiking backpack should be correctly sized for your torso length-not height- and hip circumference. A sales rep at an outdoor store like REI can help you figure this out, or you can follow a sizing guide to determine it yourself.
Measuring Torso Length
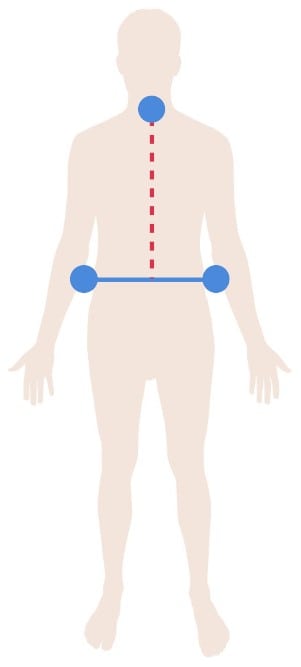
To measure your torso length, first grab a friend and some measuring tape. Locate the C7 vertebrae, by tilting your head forward and feeling for the bony protruding knob at the base of your neck. This is the starting point for your measuring tape.
Tilt your head back up, and have your friend run the tape down the center of your spine until you reach the iliac center. This is where the base of your spine lines up with the highest point of your hip bone.
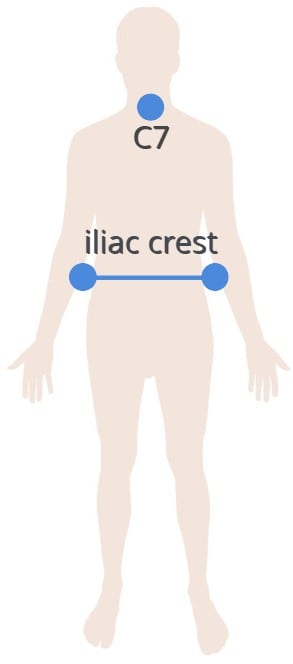
Measuring Hip Size
Usually, if the torso length is accurate, the hip belt will fit but knowing your hip size is still important since you will be carrying the bulk of the weight of your pack on your hips.
To measure your hip size, simply wrap a measuring tape around the highest part of your hips, making sure to hug your iliac crest.
How to Adjust Your Backpack
These are some tips on how to adjust your backpack to fit correctly. You’re going to want to do with it when you get a new backpack, but also once in and while to make sure you’re getting the perfect fit.
Not only for comfort but also to prevent injuries.
Adjust the Hip Belt
The role of the hip belt is to evenly distribute the weight of your pack, removing the brunt of the load from your shoulders and distributing the weight to your hips.
To fit your hip belt, fasten the hip belt at hip level, or right above your glutes. The top of the hip belt should sit an inch above your iliac crest. Tighten the hip belt to stabilize the pack.
Adjust the Torso Length
Next, you will want to adjust the torso length. To do this, start by sliding the straps completely out of the load lifters and out of the ladder lock buckles.
The harness will fall down from its attachment point, revealing two tri-glides on the backside of the harness.
Pull the straps in either direction to shorten or expand the torso length. Once satisfied, secure the straps back into the ladder lock and load lifters.
Are your hiking boots comfortable to wear? A lot of thought goes into your boots but what about your socks. Check out our article about avoiding cotton socks, and what you should wear instead.

Adjust the Shoulder Straps
With the torso length adjusted, you can now adjust the load lifters and shoulder straps. The harness should be touching your shoulders, but have enough room to slide your thumbs through.
If you pull down on the load lifters and the harness straps come off your shoulders, you have pulled too much.
Adjust the Sternum Straps
Finally, it’s time to adjust the sternum straps. If the chest straps are movable, position them at the top of your chest. Tighten the sternum strap to position the shoulder straps snugly but not too tight that it could restrict breathing.
How to Pack Your Gear Correctly
Packing your hiking backpack correctly will go a long way in making sure you’re comfortable. Even the best pack on the market won’t fit a poorly packed bag.
Once you have your pack adjusted, you can start packing it with gear. Packing your gear correctly is like a game of Tetris.
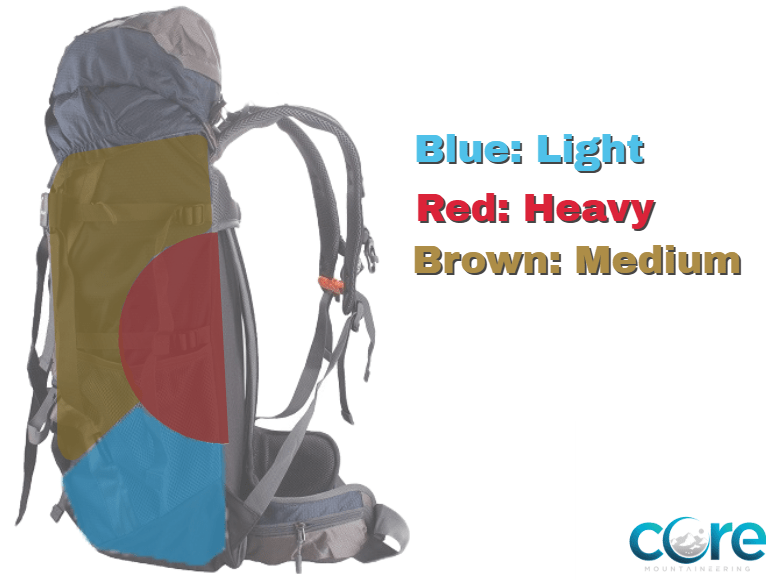
It requires strategy and careful placement. Here is a breakdown of where you will want to pack your gear in your pack:
- Bottom Zone: Good for bulkier gear and items not needed until camp
- Middle Zone: Best for heavier, denser items
- Top Zone: Good for larger essentials you will need on the trail
- Pockets: Good for gear that you will need often
Bottom Zone
Bulky items that you won’t need access to until camp should go on the bottom of your pack. These items include:
- Sleeping bags
- Sleeping pads
- Any layers, such as long underwear, that you plan to sleep in
- Camp shoes
Packing these items towards the bottom of the pack also creates a shock absorbent system that will have your back and pack thanking you.
Middle Zone
Heavier gear that you won’t need access to on your hike should go in the middle of your pack. These items include:
- Bear canister
- Camp meals
- Cook set
- Stove
- Water reservoir unless you have a separate compartment
Placing heavier gear in the middle of the pack helps create a stable center of gravity. Placed too low, and gear can make your pack sag. Place too high, and gear will make your pack top heavy.
To keep these heavier items from shifting around while hiking, use softer items such as a tent fly or extra clothing to create a buffer.
Top Zone
Bulky, trail essentials should be placed in the top of the pack. These items include:
- Insulated jacket
- Fleece top and pants
- Water filter or purifier
- Toilet supplies (toilet paper and trowel)
- First aid kit
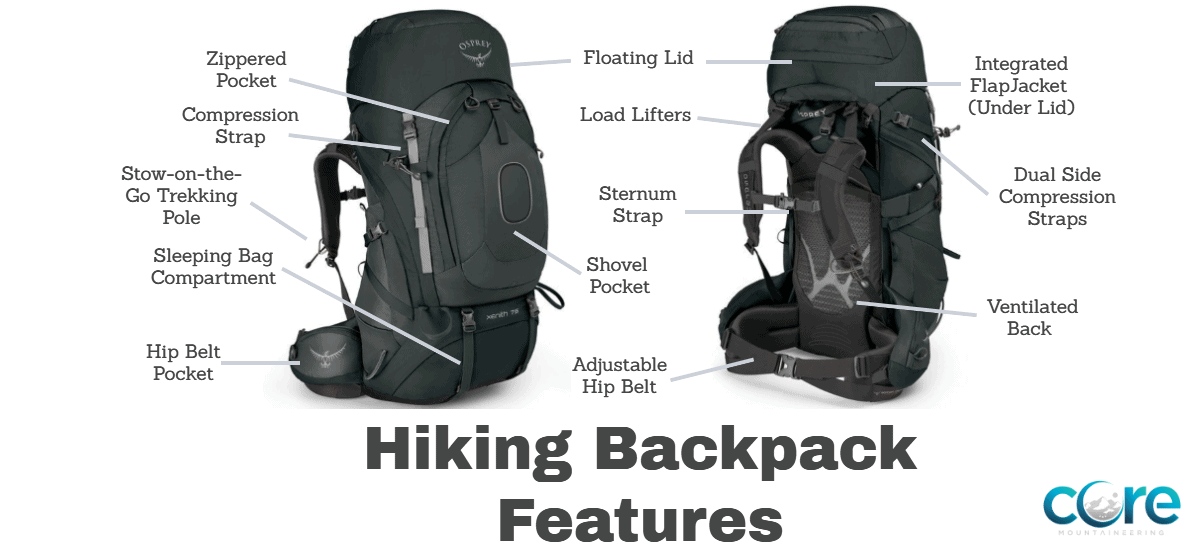
Pockets
Packs differ in the pocket features they provide. Some have top lips, front pockets, mesh side pockets, and hip belt pockets. These pockets are great for storing smaller trail essentials such as:
- A Map & Compass
- GPS
- Sunscreen & Sunglasses
- Headlamp
- Water bottles
- Bug spray
- Lip balm
- Rain cover
- Car keys
- Snacks
Some packs come with a mesh front pocket that is great for storing your wet rain jacket so it doesn’t get the contents of your pack wet.
Compression Straps
The last step to making your hiking backpack more comfortable is tightening the compression straps.
Compression straps are designed to squish the load closer to the pack frame, bringing the weight and contents of the pack closer to your body for better weight transfer and comfort.
You don’t have to break in a hiking backpack, but you do need to break in hiking boots. In our guide, we show exactly how to break them in correctly.
Wrapping Up
Your hiking backpack is uncomfortable and painful because it’s not fitted or packed the right way. With a few adjustments, you should be able to hike most of the day without any pain.
If you have any other tips we’d love to hear them. Feel free to leave a comment and I’ll add them to the list.
Do you need help finding the right pack for you? Make sure to check out our Ultimate Guide to Choosing the Right Hiking Backpack.