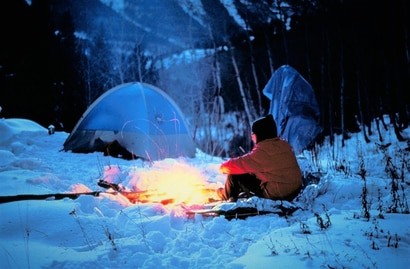
There’s something beautiful about a white winter. A thick blanket of snow resting on top of a landscape adjacent to the bright blue sky. These are sights warm weather campers never see. Winter camping forms our character and brings out our best. The winter can also bring danger, testing our preparation for a cold night. Let’s look at some ways to winterize our tent and prepare for these cold winter nights.
Summer vs. Winter Tents
Let’s go over different camping tents before we get into fully pushing the possibilities of what gear we already have. This is just in case you decide that you really should get a winter tent instead of trying to squeeze another season from your 3-season tent.
The three-season or spring, summer, and fall tent you have were made to be lightweight while being able to stand up to some snow and light winds. The thin walls and floor materials provide less bulk and weight. Even the aluminum frame and sleeveless pole construction cut down on weight while remaining secure, for most mild weather. They are just not suitable for extreme conditions with heavy snow and violent winds.
Three season tents do a great job with ventilation. Open mesh walls and a few vents allow air to flow freely throughout the tent. The side rain walls and rainfly have a large gap from the mesh wall to let the wind blow inside. All the mesh and open-air prevents condensation buildup and keeps the tent cool during the hot summer nights. A three-season tent is a great package that’s typically between 3 to 6 pounds in weight.
Winter or four-season tents are designed to withstand extreme weather. They stand up to heavy snowfalls, hail, ice, and fierce winds. While they are called four-season, people usually only use them in the wintertime. This is because of their extra weight from having double walls and generally made from better, thicker material.
The ideal four-season tent should be double-walled, free standing, and have proper crossflow ventilation. While it would be great if a tent like this could also be lightweight unfortunately well made four-season tents are heavy.
Just Use Your Summer Tent
Chances are you already have a tent, that’s probably why you’re here. I’d recommend you buy a winter tent if you’re going to be outdoors a lot during the winter months. There’s no way around it; a winter tent is going to be the best for winter camping. But, the next best thing is maximizing what you already have. Typically, we go camping far less during the winter, so why spend hundreds of dollars on a new tent unless you’re going to get tons of use out of it. You can save a lot of money by following this guide and have a more enjoyable time. With that out of the way, let’s work with what you already have.
Choose the Best Area to Place the Tent
Standard camping tent placement applies here. You’ll want a flat area not too close to water, next to some trees to tie an insulated tarp for a windbreak. Think about natural windbreaks as well. Bushes, rocks, or a fallen tree. If there’s snow on the ground, pile up snow upwind of your tent as a natural windbreak. This will be a bit of work, but it’s well worth it at night time.
If there’s not that much snow on the ground, consider removing the snow before pitching the tent. The snow will melt as you sleep and might refreeze, making for some uncomfortable hard lumps. Leaves are fine on the ground as long as you remove sticks and rocks, so they don’t puncture the tarp and tent.
Insulated Tarps
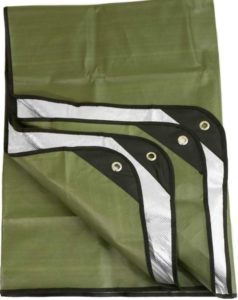
I always use a tarp under my tent even during the summer. It’s just a regular tarp with hardly any insulating properties. For the summer, I primarily use it, so I don’t get any small holes on the floor of my tent. For winter camping and insulated tarp, it’s going to protect you from the cold ground. These aren’t cheap emergency space blankets. Insulated tarps are durable and made to last.
I recommend the Arcturus Heavy Duty Survival Blanket Tarp. You can see the features and current price on Amazon here. This one is 60″ by 82″ and comes with a waterproof bag as well. It can also be used as an emergency blanket if needed. Make sure to use a tarp smaller than the floor of the tent. If the tarp is sticking out, snow and rain will build up, letting water get underneath the tent, then possibly refreezing. If the tarp is a little large, fold the ends under the tent floor.
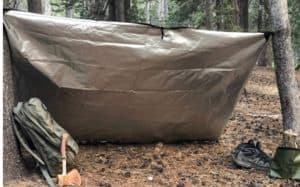
Use another insulated tarp as a windbreak. Tie the tarp upwind between two trees, slanted if possible. To insulate the tent itself hang and tie-down an insulated tarp over the side, where the wind is coming from. For the inside, duct tape an emergency space blanket on the walls. This helps by trapping a large amount of heat inside the tent. I’ve seen people spray adhesive on the canopy to secure plastic and space blankets, while effective, it’s a sticky mess, and I don’t recommend anyone doing this.
Use the leaves
Just like the snow push leaves up on the side of your tent to create an extra barrier. While this in itself might not do much, every little thing we do to help winterize our shelter helps. This is a helpful tip if no snow is around or no natural barriers like the fallen tree to use as a windbreak. Only kick up leaves on the low sides around the tent but not your entrance itself. No need to be dragging tons of leaves inside your tent when you go to get in for the night.
Renting a Tent is Always an Option
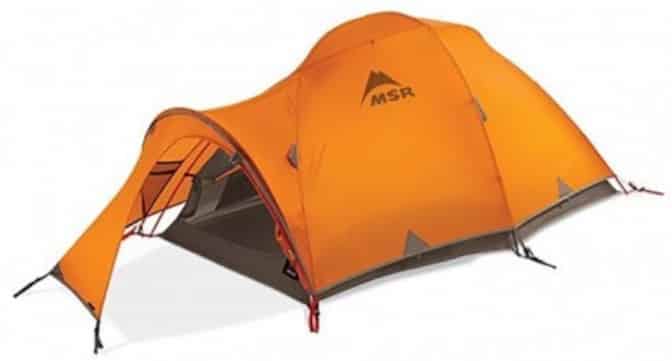
Everything we do isn’t a substitute for a real 4 season tent. If you think it’s just better to get a 4 season tent, it’s always a great option to just rent one. I’ve mentioned lowergear.com before for other rental camping gear. They are known for having fantastic customer service. They rent an MSR Four-Season, All-Weather, 2-Man for extreme conditions. A 3-day rental for this tent is 65 dollars. This is a cheap rental fee when checking the rei.com website selling this same four-season tent for 800 dollars. The tent is double-wall, well-tensioned in ferocious winds. They achieve this in part from the tent pole material. The poles are not aluminum like most tent poles. They are made from Easton Syclone, it’s a next-generation pole that’s virtually indestructible. You can also see the tent on Amazon here if you want to read the features and check if the price has gone down.

Down Sleeping Bags
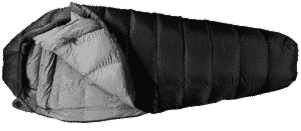
A proper sleeping bag in winter is going to be your biggest bang for the buck. What makes down fill so unique is it’s incredibly insulating and has a great warmth to weight ratio. Ounce for ounce, down is the warmest insulating material available. While synthetic fill has its place down is fantastic in dry, cold environments.
What is down fill? The down of birds is a layer of fine feathers found under the tougher exterior feathers. Very young birds are not only adorable but are covered only in down. There are a few types of down. High quilty down in sleeping bags or down jackets is duck or goose down. Goose down is better than duck because the down cluster is more significant and has more loft. Since lofty down is warmer down, it’s going to be one of the vital deciding factors of your choice of sleeping bags. This is measured in fill power. I recommend an Outdoor Vitals down sleeping bag for their quality and reasonable prices. Check the current price of this sleeping bag on Amazon here.
If you want to read further, I have a full article about choosing the correct sleeping bag in all weather climates here. Just know that we want a down fill sleeping bag for winter camping.
Sleeping Bag Liner
I always recommend a sleeping bag liner, even in the summertime. They keep the inside of the bag clean while adding warmth. A liner is also nice because, after your camping trip, you can machine wash the liner and avoid the lengthy hassle of washing a sleeping bag. If you liked the idea of renting camping gear like the winter tent, you could always rent high-quality sleeping bags as well. Renting a bag might seem a little gross (I’d be okay with it, but I can see why someone wouldn’t) add a personal liner for extra comfort and a barrier from the bag.
Sleeping Pads
Use a high-quality sleeping pad for its insulation properties. There are a few different sleeping pads but go for the self-inflating pads or the foam sleeping pads. Self-inflating pads use open-cell foam that has an open-core construction. This allows the air to sit inside for some extra insulation. As the pad unrolls, it “self inflates,” although you’ll need to blow some air in it to top it off.
Foam sleeping pads are the large foam pads you see strapped to the exterior of hikers backpacks. They are rolled or folded and don’t need to be inflated so that they won’t get punctured. These pads can take a beating and are great for the person that doesn’t want to worry about popping the pad. Another great thing about them is that they are always ready for a quick break. With no setup and their rugged nature, you can lay or sit down anywhere.

Stay away from the ultralight thin air sleeping pads. These are fine during the summer, but they are so light and thin you’ll be able to feel the cold ground through it.
What Are You Going to Wear
Change your sock before getting into your sleeping bag. Even if they seem dry, they can be a little moist and will make your feet cold throughout the night. Wear what makes you comfortable but also warm. Remember to bring a beanie for your head if you don’t have a hooded sweater.
Tent Heater
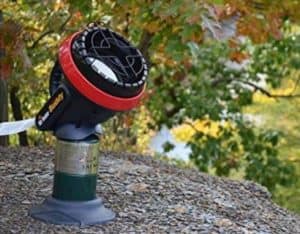
The Little Buddy camping tent heater is an Indoor-safe portable propane heater for small rooms or tents. The best thing about this heater is the automatic low oxygen shut-off system. It also shuts off automatically if the unit tips over. If your going to be sleeping freezing weather and don’t mind the extra weight bring this heater along with you. They sell a few different size units, but the small one is fine for a tent. See the current price of the Little Buddy heater on Amazon here.
Little hand warmers are great for inside sleeping bags. They are cheap single-use long-lasting pad heaters. They only need to be shaken to be activated and should last for a few hours. The manufacturer says they last up to 10 hours, but the ones I’ve used haven’t come close to that. I do like the small size that fits inside the front pocket of a sweater. I put my hands inside that front pocket, keeping them nice and toasty. See the current price of these hand warmers on Amazon here.
Extra Tips!
- Sweat, oils, and moisture buildup in your sleeping bag overnight. In the morning, hang your sleeping bag open over your tent or something that won’t get it too dirty to air it out.
- During the day our sleeping bags are compressed, I like to fluff my down sleeping bag by shaking it to get the loft nice and fluffy again.
- Keep your mouth and nose outside of the sleeping bag while you sleep. Moisture will build up in your bag if you’re breathing in it.
- Urinate before you go to bed. Holding it all night will make you colder because your body is using energy to keep that liquid warm.
- Use a pee bottle inside your tent. Since holding your urine while you sleep will make you colder, it’s important to empty your bladder on cold nights.
- If you want warm boots in the morning, keep your boots or shoes in a stuff sack and put them below your feet inside your sleeping bag if you have room.
- Before headed to sleep, boil some water and put it in your water bottle. You can use it inside your sleeping bag to keep warm all night.
- If you think your water bottle might freeze, you can put a sock around it I keep it inside the tent. Since this is the water I’m going to be drinking from throughout the night, I use some boiling water mixed with the cold water. The water temperature is just perfect.
- After peeing in the designated bottle, you should make sure it’s properly shut, and take it back into your sleeping bag. It will be at body temperature, so why waste the energy of that heat to be dissipated outside the bag.
Doing one of two of these probably won’t help that much, but together, it will make camping in the wintertime much more enjoyable. While placing the tent in the right place and setting up wind blocks helps, your sleeping bag will play the most significant role in your comfort throughout the night. There’s just no substitute for a proper sleeping bag.
I hope you have found these tips and tricks helpful. If you have something that helps keep you warmer and more comfortable out in the cold, please let us know down in the comments!